Friday, August 24, 2012

August ARTISTE Blog Hop - Artiste 365 Project #4

Welcome to our August ARTISTE Blog Hop! Each month we will showcase a feature of the amazing ARTISTE Cricut cartridge which can be purchased exclusively through a Close to My Heart Independent Consultant.


We're so excited to be doing this hop and we have a fabulous lineup with some very talented ladies. There will be lots of fun projects!!!

This month we will be showcasing a different page from the Artiste cartridge! Did you know there were 700 images on this cartridge?? That's right -- 700!!!

If you just happened to come to this blog, you should start at the beginning at Lucy's blog -
http://www.love2createitall.com


For those of you following my Artiste 365 Challenge this is my project #4. 


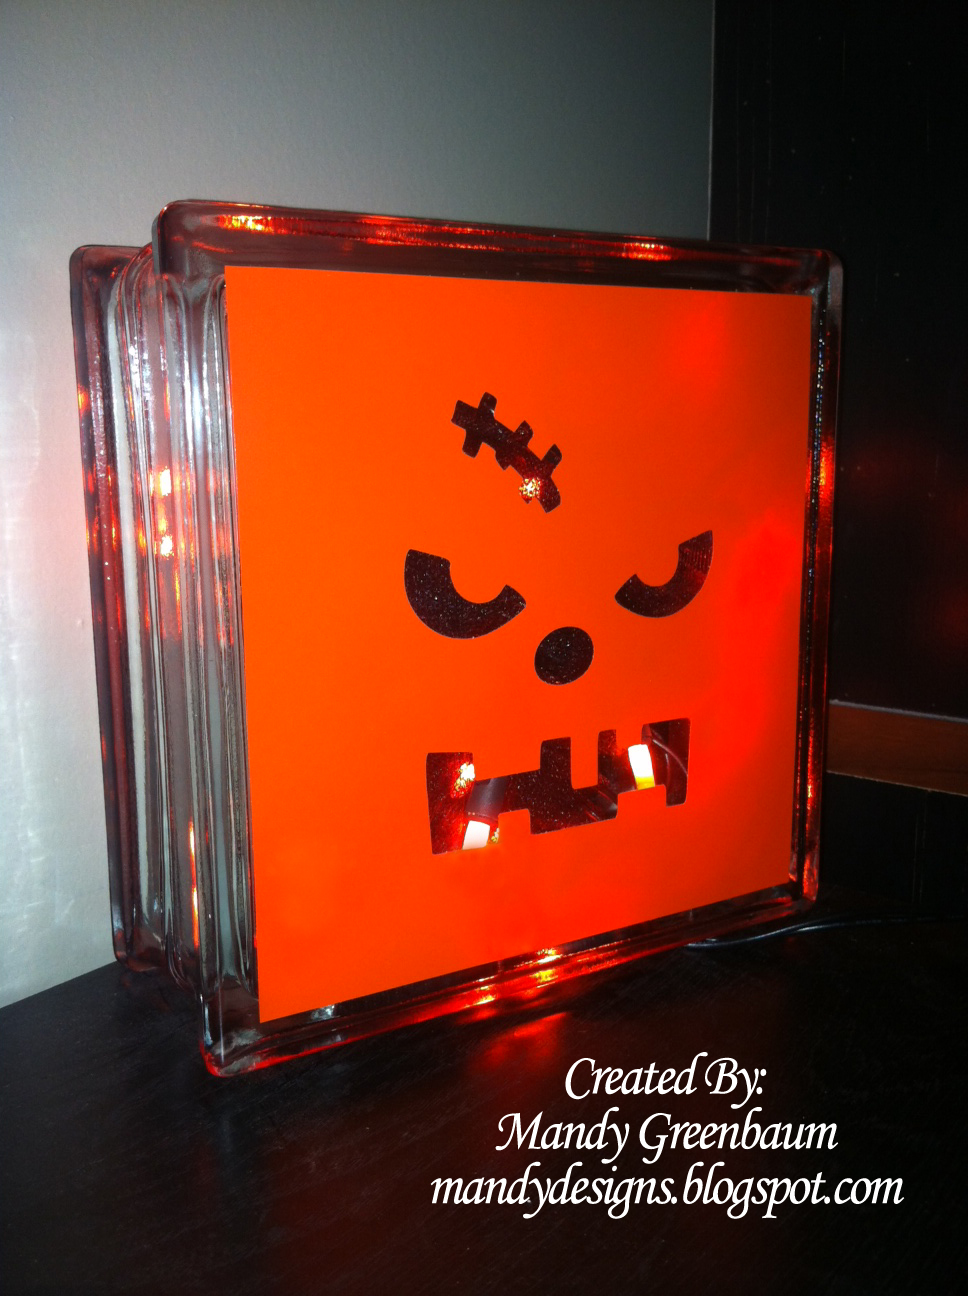
 I created this cute glass pumpkin to place by our front door during Halloween (ok so maybe he isn't so cute, a little scary haha). He was super easy to put together, all you will need for this project is the following supplies:
  • Glass Block
  • Orange Vinyl
  • String of lights (I chose to put in orange lights that I found at my local craft store)
  • Black Tulle

The pumpkin face can be found on page 77 of the Artiste Cricut cartridge. I cut it out on my Gypsy and arranged a square around the face so that it would fit nicely on the block. However, if you do not have a Gypsy you can cut it out as it is, leaving enough space on each side and then with a ruler and craft knife cut the square by hand. It is important for me to mention that if you have never cut vinyl on your cricut before it is a lot different than cutting paper, it's more delicate. The settings you will need to cut the vinyl at are 3-3-3, or medium speed, medium pressure and blade depth 3. This was it will cut the top layer of your vinyl and not the backside and it will not snag your vinyl as easily.

Once the vinyl was cut, I left it on the Cricut mat and peeled off all the parts I didn't want. Basically I peeled out the insides of the eyes, nose and mouth along with the outside of the square. I then took a piece of vinyl transfer tape and applied it over top of the vinyl. I then rubbed on top of the transfer tape so that the vinyl would stick to the transfer tape. Then I slowly peeled up the transfer tape, making sure that the vinyl is lifting up, if there is a spot that isn't you just lay the transfer tape back down and rub that spot again. Finally I centered my vinyl over top of my glass block, laid is down and rubbed it again and slowly peeled off the transfer tape. While there is no wrong way of doing this, I applied my vinyl in a way so that the opening of my glass block was on the bottom. That way the cord for the lights could easily come out.

Once the vinyl was done I took my string of lights and a long piece of black tulle and started randomly stuffing it inside the glass block.

Now you have a beautiful glass block ready to put on display for Halloween :)

If you would like to do this project and do not already have this awesome Artiste Cricut cartridge, you can purchase it on my Close to My Heart website by clicking here.

Also if you purchase anything from my website between now and September 15th, you can choose to purchase this great double stamp set called "It's Your Day" for only $5! That's a savings of $30!!! Be sure to grab this great stamp set while you can before they are all gone. 

The next stop on your blog hop fun is Joanne at http://josiesjoy.blogspot.com


Here is the list of all the talented consultants who are participating in this months blog hop:

1.      Lucy ~ http://www.love2createitall.com
4.      Theo ~ www.celebratecrafts.com
5.      Tina Gale ~ http://tiggersscrapplace.blogspot.com
6.      Stephanie ~ http://www.quiltedscrapper.blogspot.com
8.      Joanne ~ http://josiesjoy.blogspot.com
11.  Maria Woodworth ~ - http://mariawoodworth.blogspot.com
12.  Judith Ashmore ~ www.grammiejudys.blogspot.com
13.  Lisa Woodward ~ http://mycraftyspaces.blogspot.com
14.  Laura Charkohttp://koladesigns.wordpress.com/


Thanks so much for stopping by and hopping with us - we hope you LOVE all the projects we created!

My other passion....photo restoration!

For the last few years I have been working on my new hobby of photo restoration. Five years ago my Grandma passed away and she was the one where I get my love of scrapbooking from. When Grandpa died a few years later I took over all of Grandmas photos and decided it was my duty to restore them to their former glory. So over the last few months I have been working on a multi-album project. First I have been working on an album of all Grandma photos, basically a timeline of her life. Then I will do the same thing with Grandpas photos and finally a combined album of photos of them together throughout the years.

There are approximately 400 photos in Grandma's album and I have photo restored each and every one of them. I am down to the last few photos to restore. Tonight I worked on one I had been putting off for a while because it was going to be a lot of work. The photo had a lot of damage and with all the lines in the photos that makes it more tricky. However I decided to finally sit down and tackle this photo once and for all.

Here is the final result:

                                       Before                                                    After

In order to better see the details that needed the work you will need to click on the photos to enlarge them.

I do this work as a side business. If you have photos that you would like work done to them let me know and we will work something out. This is my passion, giving new life to old photos so that they can be enjoyed by future generations!

Let me know know what you think of the work by leaving a comment below :)

Saturday, August 18, 2012

Rebecca's Birthday Blog Hop Bash - Artiste 365 Project #2

Happy Birthday Rebecca!!!


Rebecca joined my Close to My Heart team a few months ago and I am very proud of the great things she has done with her business! Even though her Birthday was Monday, we are celebrating by doing a Birthday Themed Blog hop!!!! We would love for you to hop along with us and celebrate her birthday!!! One lucky Winner who follows all the way through will win an awesome Prize Pack... I also know there are prizes along the way!

You should have come here from Jamie at http://www.jamielindstromdesigns.com/, but if you just popped on by to see me today then head on over to Rebecca at blog.scrapprincess.com to start the hop from the beginning. You won't want to miss any of these amazing projects!!! The ladies in participating in this birthday blog hop bash are all very talented!

So for my project I wanted to a unique birthday card with the new Artiste Cricut cartridge by Close to My Heart. For those of you who are following my Artiste 365 Project, this is Project #2 :)


The design of the card is pretty basic. What makes this card pop is the great shape that I cut out using Artiste and the technique I did on the background. The background looks like it is metal. However, it started out as plain white cardstock and only took me a few minutes to do.

Here are the supplies you will need for the background:
Bamboo Exclusive Inks® Stamp Pad
Twilight Exclusive Inks® Stamp Pad
Olive Exclusive Inks® Stamp Pad
Cocoa Exclusive Inks® Stamp Pad
Sponge Daubers
Versamark® Ink Pad 
Gold Embossing Powder

I will be posting a more details tutorial of how to do the patina technique but have scanned in photos of what each step of the inking process looks like. Be sure to stop back later today for detailed instructions on how to do this great technique!

Step 1:


Step 2:


Step 3: 


Step 4: 


GIVEAWAY!!!
To celebrate Rebecca's Birthday, I wanted to giveaway a special prize! All you have to do to have a chance to win is to become a follower of my blog, make a comment below and let me know what you think of this technique and also in your comment send Rebecca Happy Birthday wishes :) That's it!

What is the prize you ask? I am working to put together a special prize package today of some goodies, including a Close to My Heart stamp set that is no longer available!

Again, Happy Birthday Rebecca!!! I am very proud of you and am so glad you joined my team! :)


And your next stop on the hop is Paula at http://preciouspagesbypaula.blogspot.com/


The Blog Lineup

Artiste 365 Challenge - Project #3


This is a cool orange decanter that I bought at my local craft store for only $4. I then cut out 2 of the spider webs from page 76 on the Artiste Cricut Cartridge at 3 1/4" and another one at 3 3/4" out of black vinyl. I then peeled off the backing and carefully applies the vinyl to the glass, smoothing out any bubbles.

I thought this decanter would be a cool way to store Halloween colored M&M's and sit it out for a party!

If you are interested in doing this project the link below will take you to the page of my website where the Artiste Cricut cartridge can be purchased.

Friday, August 17, 2012

My New Blog Header Graphic

Normally when a blog designs a new header graphic it's not a big deal. But I want to explain what makes my new one so special. When I was a kid I was very close to my Grandma. She is where I get my love of scrapbooking and crafting from. I have so many memories of sitting at her kitchen table, watching her soap operas on a little TV and doing a cool crafting project. I can remember being mesmerized at the wallpaper she had on the wall, it almost looked like wood or a grass pattern, and I loved it so much.

Well back in 2007 Grandma lost her battle with Alzheimer’s and I miss how sitting at her kitchen table made me feel so talented and crafty. A few years ago while cleaning in Grandma and Grandpas house we found a roll of that wallpaper that I spent so many afternoons looking at to get inspired. So as I move on with my scrapbooking business I had my very talented mom design my header graphic after scanning in a piece of the wallpaper. Notice all those pretty tan flowers? They are made using the pattern of the wallpaper! We may be making a few changes to the graphic over the next few weeks but this is our first attempt at something new and special. My hope is that as I log on to my blog to post new projects to share with all of you that this new header graphic helps to keep me inspired :)

Wednesday, August 15, 2012

National Stamping Month Promotion

 
I am so excited to tell you all about a sale that Close to My Heart just started today. Today starts our National Stamping Month promotion where for just a $35 order you can get this fabulous stamp set for only $5! How great is that?! Normally our stamp sets only come with one sheet of stamps in them but this fabulous set comes with 2 and is worth $35 in retail.....for only $5!!!! Check out the link below for an up close photo of this great stamp set!

 http://mandybydesign.ctmh.com/Retail/Product.aspx?ItemID=7006&CatalogID=710

If there are items on your Close to My Heart wish list (especially with all of our new products that were released this month) this is the time to stock up on it and get this fabulous stamp set for only $5.

Close to My Heart has also added some new clearance items that are While Supplies Last. There are some fabulous deals in there and definitely worth taking a look at. It would be a great time to start that early Christmas shopping for that special scrapbooker in your life, or you :)

To check out the great deals in the While Supplies Last section check out the link below:
http://mandybydesign.ctmh.com/Retail/Products.aspx?CatalogID=1702

If you plan on doing any shopping I have started an online book gathering for all of you :) You can join it by going to the main page of my Close to My Heart website and down below the main large photo is a section that says "Join one of Mandy's Gatherings". Just click the red "Join" icon and you are all ready to go!

Monday, August 13, 2012

My Marker Storage Solution

I go to a lot of scrapbook crops and when I do I like to take all my ink pads and markers so that not only I can use them, but also so my friends can use them. So it was important when I started building up my marker collection that I find a storage solution that held all my markers in one container and made them more easily accessible.

I came up with this storage solution, originally meant to hold photos. I bought the main outer box and then all the individual inside boxes. The inside boxes hold 5x7 photos, while also holding most marker sizes. So what I did was sort all of my markers into categories and then put each category in it's own box.


Let me know what you think :) If you are interested in getting a similar marker box set up I have saved the stickers that went on the main outer box and one from the inner boxes, including the UPC's.

Close to My Heart just came out with their own line of alcohol ink markers, which fit in these boxes. I cannot wait to start playing with mine :)

If you are interested in the new alcohol markers check out my Close to My Heart website and it will show you all the fabulous colors the markers come in.

http://mandybydesign.ctmh.com/Retail/Products.aspx?CatalogID=39


Thursday, August 9, 2012

Pearl Pens Technique

A while back I discovered how to do this cool technique while experimenting with my supplies. I discovered how to color pearl pens whatever color I would like them to be. In the video I show the distress ink colored ones I made. However since making this video I have learned that the pearl pens can also be colored with the re-inkers that Close to My Heart sells.


Let me know what you think! :)

If you would like to make your own pearl pens you can find a bunch of cute colors of re-inkers on my Close to My Heart website:
http://mandybydesign.ctmh.com/Retail/Products.aspx?CatalogID=321


Wednesday, August 8, 2012

Artiste 365 Challenge - Project #1


This is a birthday Card I made for my stepdad tonight. Today was his 51st birthday and I wanted to make him a cool birthday card with artiste. I chose this paper solely because some of the postage stamps has sailboats on them and my stepdad is big into sailing. 

One of my main goals of this 365 challenge is to show you techniques and projects you would never think of being able to do with this great cartridge! My favorite part of this card is a great technique I learned with my good friend Tracey from Garden of Grace. See the cool gears on this card, the one of the front and the one at the top of the tag inside the card? Looks just like metal doesn't it? Cool thing is....it's not metal...it's paper! This look is accomplished by covering the object you are trying to get this look on with embossing ink. Then is a small container put some black embossing powder with a little bit of a metallic embossing powder. The ratio for this should be about 85% black embossing powder and 15% metallic embossing powder. I keep a series of storage containers with these mixtures in them. This particular one is my black mixed with copper embossing powder. 

Below is a list of the pages that the pieces I cut out for this card can be found in the Artiste Cricut book:
Base card/pocket: Page 38, shift key, card button
Gear tag: Page 38, card button
Gear on front: Page 39, shift key, accent 2 button

If you are interested in doing this card the links below will take you to the pages of my website where the products I used can be found :)
Let me know what you think of this project :)

It's finally here.....my new Ink Inventory sheet!

Feel free to download my new ink inventory sheet. The first page is the current 42 ink colors for the new idea book. The second page has all the retired colors, including older retired colors. Let me know what you think :) CTMH Ink Inventory2012

Tuesday, August 7, 2012

Artiste 365 Project

So many of you may remember my Art Philosophy 365 Challenge. I never finished the challenge, life caught up with me....funny how that happens. I do plan to finish it though. In addition to that challenge I am doing a Artiste 365 Project for the new Artiste Cricut cartridge, to show great the cartridge is. I have several projects I am working on and will be working on taking photos of this week so that I can post for all of you to see. Some hints for upcoming projects: cool cards, awesome 3D projects, great glass etched projects...just to name a few!